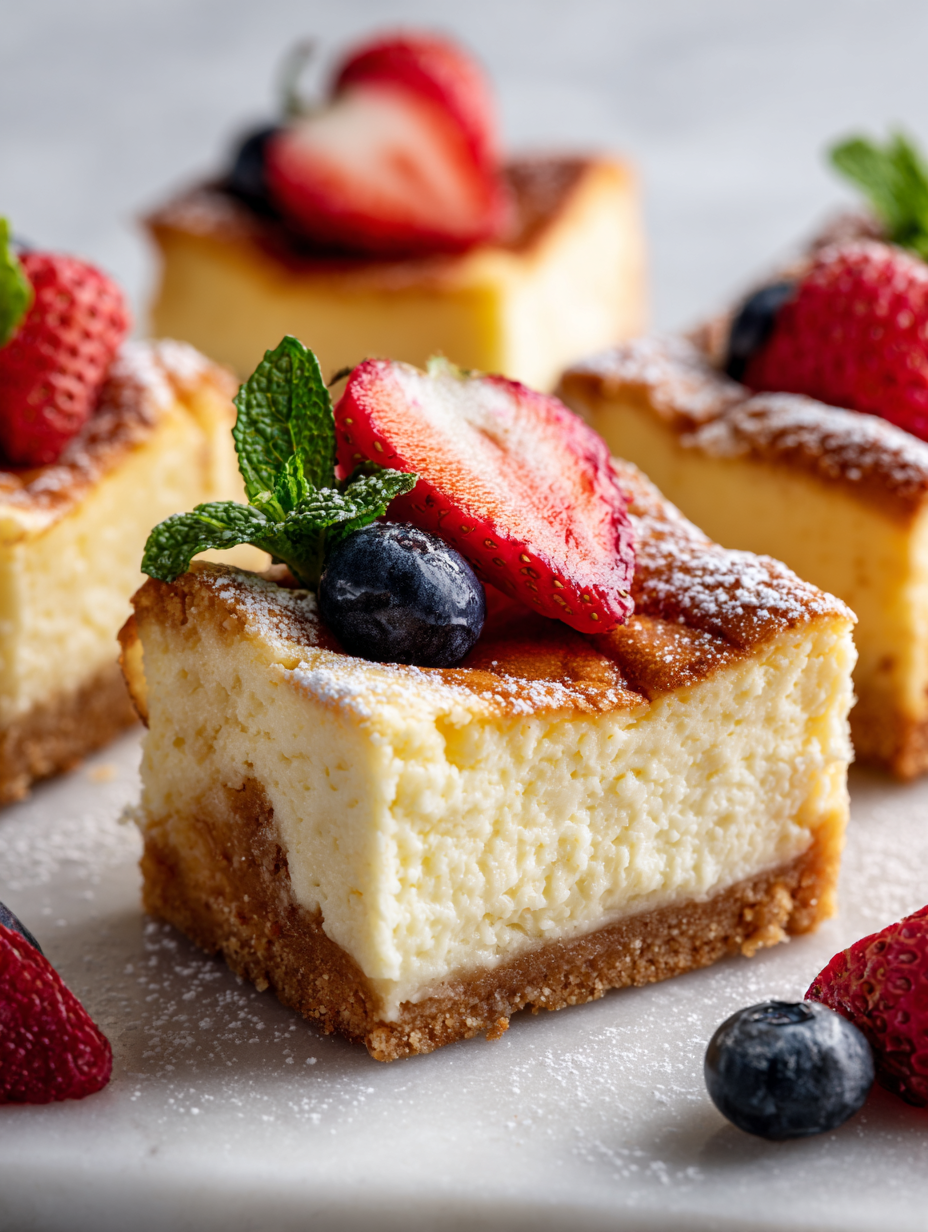
Cheesecake bars are surprisingly forgiving, and that’s what drew me to perfecting my own recipe. I used to think cheesecake was just too delicate, too easy to mess up, but these bars changed my mind. They’re rich, creamy, and the kind of dessert you can whip up on a whim without fussing over water baths or fancy techniques.
What I love most is how adaptable they are—no fuss, no stress, just a simple bake that yields a smooth, luscious filling every time. Plus, they’re perfect for sharing; cut them into small squares and suddenly you’ve got a crowd-pleaser that feels luxurious but is totally doable for a home cook like me.
Focusing on the surprisingly forgiving nature of cheesecake bars, I find them perfect for amateur bakers who want foolproof results without sacrificing rich flavor or texture.
The story behind this recipe
- This recipe started during a chaotic family brunch, where I realized everyone was eyeing the last square. I had only a few staples in the fridge, so I threw together these bars, improvising with what I had. The surprising part? They turned out rich, smooth, and just sweet enough to tame the chaos.
- Since then, these cheesecake bars have become my go-to for when I need comfort or want to impress without fuss. They remind me that sometimes, simplicity and a little bit of improvisation can lead to the most memorable desserts.
- heading: ‘The story behind this recipe’
Key ingredients and tips
- Cream Cheese: I prefer full-fat, it’s the ooziest and gives the bars that luscious, melt-in-your-mouth texture. Feel free to try a slightly tangier variety for a more pronounced flavor.
- Graham Cracker Crust: I use crushed graham crackers, but for a nuttier note, substitute part of the crumbs with crushed digestive biscuits or even a handful of chopped almonds. The crunch adds a nice contrast.
- Sugar: I keep it simple with regular granulated sugar, but a touch of brown sugar can add a hint of caramel richness that makes the filling even more indulgent.
- Eggs: I always use large eggs at room temperature. If you’re out, just give them a quick beat first; it helps everything blend smoothly and prevents cracks in the filling.
- Lemon Zest: A little zest brightens up the richness—think fresh, citrusy pop. If I want a more subtle flavor, I skip it, but don’t skip the zest if you love that zing.
- Sour Cream: I prefer full-fat sour cream for its tang and creamy texture, but Greek yogurt can be a good swap if you want a slightly tangier, lighter result. Just watch the moisture level.
- Butter: I melt unsalted butter for the crust; it helps everything stick together. If you want a slightly richer crust, use browned butter for that smoky, nutty aroma.
Spotlight on key ingredients
Cream Cheese:
- I prefer the full-fat kind—it’s the ooziest and melts into a silky, melt-in-your-mouth filling. If you want a tangier bite, try a slightly sharper cream cheese, but don’t skimp on the richness.
- Graham Cracker Crust: I crush these until fine, but a few slightly larger crumbs add a nice crunch detail. For a nuttier flavor, toss in crushed almonds or digestive biscuits. The contrast of crumbly and crunchy is what really makes it.
Lemon Zest & Sour Cream:
- Lemon Zest: Brightens everything up with a fresh, citrusy zing. It’s the little pop that makes the creamy filling stand out. If you skip it, the flavor feels a tad dull, so don’t forget that bright note.
- Sour Cream: I love the full-fat sour cream’s tang and velvety texture. It’s the secret to that smooth, luscious finish. If you’re out, Greek yogurt works but adds a slightly sharper tang and less creaminess.
Notes for ingredient swaps
- Dairy-Free: Swap cream cheese for a dairy-free cream cheese alternative. Expect a slightly lighter, less oozy texture, but still creamy and satisfying.
- Gluten-Free: Use almond flour or crushed gluten-free cookies instead of graham crackers for the crust. The flavor will be nuttier and the texture a bit more crumbly.
- Sugar-Free: Substitute with erythritol or a monk fruit sweetener. The filling will be less caramelized but still sweet and rich.
- Lemon Zest: Skip or replace with lime or orange zest for a different citrus punch. Adds brightness but change the flavor profile.
- Sour Cream: Use Greek yogurt or mascarpone cheese as a tangy substitute. Yogurt adds a slight tartness, mascarpone yields a richer, silkier texture.
- Butter: Replace with coconut oil or vegan margarine. Expect a slightly different flavor and a softer crust that may need a gentle press.
- Eggs: Use flaxseed meal mixed with water (1 tablespoon flaxseed + 3 tablespoons water per egg) for a vegan option. The texture will be slightly denser but still delicious.
Equipment & Tools
- 9×13 inch baking pan: Holds the crust and filling; facilitates baking and slicing.
- Parchment paper: Prevents sticking and makes removal easier.
- Mixing bowls: Combine ingredients smoothly and efficiently.
- Electric mixer or whisk: Creams the cheese and incorporates ingredients evenly.
- Spatula: Spreads filling and smooths the surface.
- Knife: Cuts clean squares after chilling.
Step-by-step guide to cheesecake bars
- Preheat your oven to 175°C (350°F). Line a 9×13 inch baking pan with parchment paper, leaving a slight overhang for easy removal.
- For the crust, crush 200g of graham crackers into fine crumbs. Mix with 100g melted butter and 50g sugar until evenly coated. Press firmly into the bottom of the prepared pan. Bake for 10 minutes to set, then remove and cool slightly.
- While the crust cools, prepare the filling. In a large bowl, beat 450g softened cream cheese with 150g sugar until smooth and creamy, about 2-3 minutes. Scrape down sides frequently.
- Add 2 large eggs one at a time, beating just until incorporated after each addition. Mix in 1 teaspoon vanilla extract and the zest of one lemon. The mixture should be smooth and slightly fluffy.
- In a small bowl, whisk together 120g sour cream and a squeeze of lemon juice. Fold into the cream cheese mixture until just combined. The filling should be glossy and thick.
- Pour the filling over the cooled crust, spreading evenly with a spatula. Tap the pan gently to remove air bubbles and smooth the surface.
- Bake in the oven for 25-30 minutes. The edges should be set but the center will slightly jiggle when gently shaken. The top may crack slightly, which is normal.
- Remove from oven and let cool in the pan for 30 minutes. Then, transfer to a wire rack and cool completely at room temperature, about 1 hour.
- Once cooled, refrigerate uncovered for at least 4 hours, ideally overnight. This helps set the filling and enhances flavor.
- Cut into small squares using a sharp knife, wiping the blade clean between cuts to keep edges neat. Serve chilled.
Allow the bars to cool completely, then refrigerate uncovered for at least 4 hours or overnight. Use the parchment overhang to lift the entire block out for clean slicing. Serve cold, straight from the fridge, with optional toppings like fresh berries or a drizzle of chocolate.
How to Know It’s Done
- Crust is golden and firm when baked.
- Filling is just set but not cracked on top.
- Center jiggles slightly when shaken, indicating perfect doneness.
Cheesecake Bars
Ingredients
Equipment
Method
- Preheat your oven to 175°C (350°F). Line a 9x13 inch baking pan with parchment paper, leaving overhang on the sides for easy removal.
- Crush the graham crackers into fine crumbs using a food processor or by placing them in a zip-top bag and smashing with a rolling pin. Mix the crumbs with melted butter and sugar until well combined, creating a crumbly mixture.
- Press this mixture firmly into the bottom of your prepared pan, creating an even crust. Bake for about 10 minutes or until golden and set. Remove from the oven and let cool slightly.
- In a large bowl, beat the softened cream cheese with sugar using an electric mixer or whisk until the mixture is smooth, creamy, and free of lumps, about 2-3 minutes.
- Add the eggs one at a time, beating briefly after each addition until just combined. Mix in the vanilla extract and lemon zest for a bright, citrusy flavor.
- Pour the sour cream into the mixture and gently fold it in with a spatula until the filling is glossy and smooth.
- Pour the filling over the cooled crust, spreading it evenly with a spatula. Tap the pan gently on the counter to release any air bubbles and ensure a smooth surface.
- Bake for 25-30 minutes, or until the edges are golden and the center jiggles slightly when shaken. The top may crack, which is normal.
- Remove from the oven and let cool in the pan for 30 minutes. Then, transfer to a wire rack and cool completely at room temperature, about 1 hour.
- Refrigerate uncovered for at least 4 hours or overnight to set the filling fully. Once chilled, cut into small squares with a sharp knife, wiping the blade between cuts for neat slices.
- Enjoy these luscious cheesecake bars straight from the fridge, perhaps topped with fresh berries or a drizzle of chocolate for extra indulgence.
Pro tips for cheesecake bars
- Bolded mini-head: Use room temperature ingredients for a smoother, more even batter and filling.
- Bolded mini-head: Don’t skip the chilling step; it helps the crust set and prevents cracks in the filling.
- Bolded mini-head: Tap the pan on the counter after pouring the filling to release air bubbles and ensure a smooth top.
- Bolded mini-head: Keep an eye on the edges; they should be golden and slightly pull away from the pan for perfect baking.
- Bolded mini-head: If the top cracks, don’t panic—refrigerate and the cracks will soften visually, maintaining texture.
Common mistakes and how to fix them
- FORGOT to watch crust baking time → Check for golden edges, not color alone.
- DUMPED filling too hot into crust → Let it cool slightly to prevent cracks.
- OVER-TORCHED edges → Cover with foil and lower oven temperature.
- FAILED to chill fully → Chill at least 4 hours for best set and flavor.
Quick fixes and pantry swaps
- When filling cracks, splash warm water over the surface for quick smoothing.
- If the crust crumbles, patch with a bit of melted butter and press gently.
- Splash lemon juice on oversalted filling to brighten and balance flavors.
- Patch cracked edges with a small dollop of filling and smooth with a spatula.
- Shield the top with foil if edges brown too quickly, to prevent burning.
Prep, store, and reheat tips
- Prepare the crust and bake it a day ahead; it stays crisp and fragrant in an airtight container.
- The assembled but unbaked filling can be refrigerated for up to 24 hours, covered tightly, to keep it fresh and prevent drying out.
- Stored covered in the fridge, the cheesecake bars will last 3-4 days; the flavor deepens slightly, becoming more complex overnight.
- Reheat slices briefly in a low oven (around 150°C/300°F) for 10 minutes or until warm and fragrant, but I prefer serving chilled for that creamy, cool bite.
Top questions about Cheesecake Bars
1. Should I soften the cream cheese first?
Use softened cream cheese for a smooth filling that melts in your mouth. Cold cheese will make it lumpy.
2. How do I know when the cheesecake is done?
Baking at 175°C (350°F) for about 25-30 minutes ensures the edges are set but the center slightly jiggles.
3. Can I serve them immediately after baking?
Chill the bars for at least 4 hours or overnight. This helps the filling set perfectly and improves flavor.
4. How do I cut clean slices?
Use a sharp knife wiped clean between cuts to get neat, tidy squares without squishing the filling.
5. Why did my cheesecake crack?
If cracks appear on top, just refrigerate the bars. The cracks soften and become less noticeable once chilled.
6. Can I make the crust gluten-free?
Replace graham crackers with digestive biscuits or almond flour for gluten-free options, but expect slightly different textures.
7. What can I use instead of sour cream?
Substitute sour cream with Greek yogurt or mascarpone for a different tang or creaminess, but adjust the moisture if needed.
8. Do I need to bring ingredients to room temp?
Use room temperature ingredients to prevent lumps and ensure a smooth, creamy batter.
9. How should I store leftover cheesecake bars?
Refrigerate the bars uncovered to prevent condensation and sogginess, ideally overnight for best flavor.
10. Can I reheat the cheesecake bars?
To reheat slices, warm briefly in a low oven at 150°C (300°F) for about 10 minutes—serve chilled for best texture.
These cheesecake bars are more than just a dessert; they’re a reminder that simple ingredients can come together to create something truly satisfying. The creamy texture and bright lemon notes make them perfect for any season or occasion. Sharing a batch always feels like an act of quiet celebration, no matter the day.
In the end, it’s the forgiving, unfussy nature of this recipe that keeps me coming back. No fuss, no stress, just a rich, smooth treat that’s easy to whip up and even easier to enjoy. Sometimes, that’s exactly what a good dessert should be.

Hey there, I’m Devon Harper. I run a small neighborhood café by day, cook most of my meals far too late at night, and write Midnight Grocery Runs somewhere in between. If you’ve ever wondered whether something simple could turn into something comforting after a long day, you’ll feel right at home here.


