These banana oat bars are my go-to when mornings are chaos but I still crave something nourishing and sweet. No-bake, no fuss, just a quick mash of ripe bananas and a handful of oats pressed into a pan. They come together fast, and I love how they hold just enough chew to satisfy that snack attack.
I’ve made these bars more times than I can count, tweaking the add-ins and trying different nut butters. The real magic is how forgiving they are—no perfect measurements needed, just a spoonful of this and a dash of that. They’re perfect for grabbing on busy mornings or tossing into a bag for a quick hike snack.
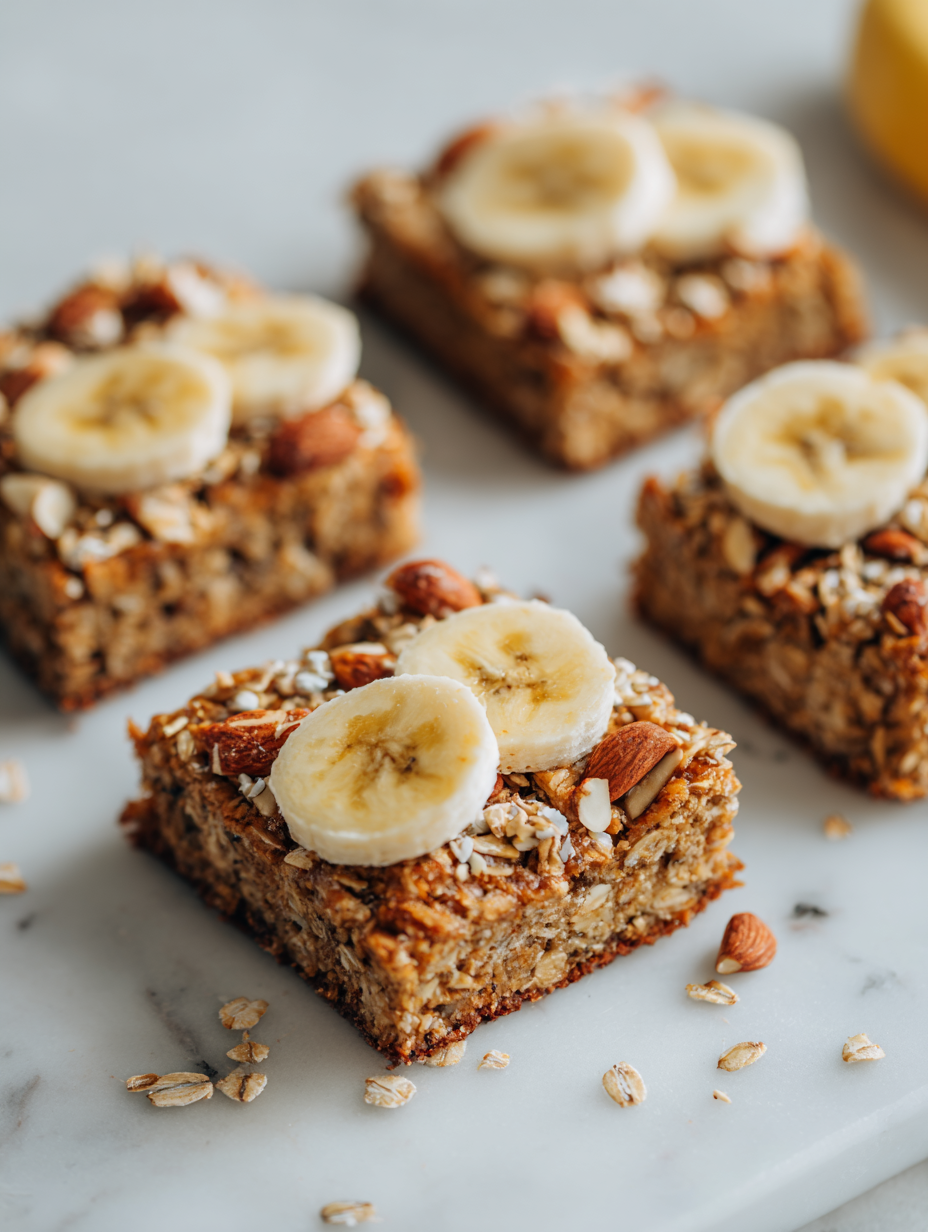
What keeps me coming back is the texture—soft, chewy, with bits of oats and banana that remind me of breakfast but in bar form. Plus, the smell of toasted oats and ripe banana filling the kitchen is a little burst of comfort, no matter what kind of morning I’m facing.
Focusing on how these banana oat bars can serve as a flexible, no-bake snack for busy mornings, highlighting their quick assembly and the satisfying texture that balances chewy oats with creamy banana.
The story behind this recipe
- This recipe started as a way to use up overripe bananas that were sitting on my counter, slowly turning from sweet to mush. Instead of tossing them, I mashed them up and threw in some oats, just to see what would happen. The result was a chewy, satisfyingly sweet snack that’s perfect for mornings or a quick pick-me-up.
- I remember the first time I made these, I was actually in a rush—no fancy ingredients, just whatever was in the pantry. The smell of toasted oats and banana filled the kitchen, and I knew I had a winner then and there. Ever since, they’ve been a staple, especially on mornings when I need something quick and wholesome.
- They’ve become more than just a snack; they’re a little reminder that simple ingredients can turn into something really good. Sometimes, I add a handful of nuts or chocolate chips, but honestly, just the basic combo hits the spot every time.
Key ingredients explained
- Overripe bananas: I love the jammy, sweet aroma they give off when mashed; use bananas that are deeply brown for maximum flavor, or slightly underripe if you prefer less sweetness.
- Rolled oats: Their chewy texture is what makes these bars stand out. Toast them lightly in the pan first for a nuttier flavor, or go raw for a softer bite.
- Nut butter: Creamy peanut or almond butter adds richness and binds everything together. If you want a subtle flavor, opt for sunflower seed butter—no one will miss the peanut smell.
- Sweetener: Honey, maple syrup, or agave—each adds a different depth. Honey gives a floral note, while maple adds a smoky sweetness—use what you have on hand.
- Add-ins: Chocolate chips, nuts, or dried fruit—these are optional but make the bars more interesting. Toast nuts before mixing for extra crunch and aroma.
- Salt: Just a pinch enhances all the flavors. Don’t skip it, especially if your nut butter is unsalted; it rounds out the sweetness and adds depth.
- Optional spices: Cinnamon or vanilla extract—these elevate the aroma and add warmth. Use sparingly if you’re sensitive to spice, or go wild for a more aromatic bar.
Spotlight on key ingredients
Bananas:
- Overripe bananas: I love the jammy, sweet aroma they give off when mashed; use bananas that are deeply brown for maximum flavor, or slightly underripe if you prefer less sweetness.
- Rolled oats: Their chewy texture is what makes these bars stand out. Toast them lightly in the pan first for a nuttier flavor, or go raw for a softer bite.
Nut butter and sweetener:
- Nut butter: Creamy peanut or almond butter adds richness and binds everything together. If you want a subtle flavor, opt for sunflower seed butter—no one will miss the peanut smell.
- Sweetener: Honey, maple syrup, or agave—each adds a different depth. Honey gives a floral note, while maple adds a smoky sweetness—use what you have on hand.
Notes for ingredient swaps
- Dairy-Free: Use coconut yogurt instead of butter for richness, though it will add a subtle coconut flavor.
- Gluten-Free: Swap regular oats for certified gluten-free oats—no change in texture, just peace of mind for gluten sensitivities.
- Sweetener: Maple syrup gives a smoky sweetness, honey is floral, agave is neutral—choose based on what flavor profile you prefer.
- Nut Butter: Almond or cashew butter works well, offering different nutty notes and creaminess; peanut butter is classic but stronger in flavor.
- Add-ins: Dried cranberries instead of chocolate chips add tangy bursts, or chopped dried apricots for chewy sweetness.
- Bananas: Under ripe bananas work if you want less sweetness and a firmer texture, but riper bananas give more flavor and softness.
- Spices: Swap cinnamon for cardamom or nutmeg for a different warm aroma—use sparingly to avoid overpowering the banana.
Equipment & Tools
- Baking pan: Holds the mixture and shapes the bars.
- Mixing bowl: Combines ingredients evenly.
- Spatula: Spreads and presses the mixture into the pan.
- Parchment paper: Prevents sticking and makes removal easy.
Step-by-step guide to Banana Oat Bars
- Gather your equipment: a 20x20cm (8×8 inch) baking pan, a mixing bowl, a spatula, and parchment paper. Line the pan with parchment for easy removal.
- In a large bowl, mash 3 ripe bananas thoroughly until smooth, with a few small lumps for texture. Smell the sweet, jammy aroma to check ripeness.
- Add 1 ½ cups rolled oats to the mashed bananas. Stir until evenly combined; oats should be coated with banana. They will absorb some moisture and soften.
- Stir in ¼ cup honey or maple syrup, 2 tablespoons nut butter, and a pinch of salt. Mix well until the mixture is sticky and cohesive. It should smell nutty and sweet.
- If using, fold in ¼ cup chocolate chips or chopped nuts for extra flavor and crunch. Toss gently so they’re evenly distributed.
- Transfer the mixture to the prepared pan. Press down firmly with the back of a spatula or your fingers to create an even layer. Pressing helps the bars hold together.
- Bake at 180°C (350°F) for 15–20 minutes. Watch for the edges to turn golden brown and the top to appear set. You’ll smell toasted oats and caramelized banana.
- Remove from oven. Let the bars cool in the pan for 10 minutes, then lift out using the parchment paper. Place on a wire rack to cool completely, about 20 minutes.
- Once cooled, slice into bars with a sharp knife. The bars should be firm and hold their shape, with a slight chewiness from the oats and banana.
- Serve immediately or store. For best texture, let sit at room temperature for 10 minutes before eating. Refrigerate in an airtight container for up to 4 days, or freeze for longer storage.
Let the bars cool completely in the pan on a wire rack. Slice into squares and serve. Store in an airtight container at room temperature or fridge. Reheat briefly in the microwave if you prefer them warm, watching for a soft, gooey texture.
How to Know It’s Done
- Edges are golden and slightly crisp when baked.
- Mixture is sticky and holds together when pressed.
- Bars are firm but still chewy after cooling.
Banana Oat Bars
Ingredients
Equipment
Method
- Line your baking pan with parchment paper to prevent sticking.
- Peel the ripe bananas and mash them thoroughly in a large mixing bowl until smooth with a few small lumps, releasing a sweet, jammy aroma.
- Add the rolled oats to the mashed bananas and stir until well combined; the oats should be coated and start to absorb some moisture, creating a sticky mixture.
- Stir in the honey or maple syrup, nut butter, and a pinch of salt, mixing until everything is evenly incorporated and the mixture becomes sticky and cohesive.
- If desired, fold in chocolate chips or chopped nuts for added texture and flavor distribution.
- Transfer the mixture into your prepared pan, pressing down firmly with a spatula or your fingers to create an even, compact layer. This helps the bars hold together nicely.
- Bake at 180°C (350°F) for about 15-20 minutes, until the edges turn golden and the top looks set with a toasted aroma filling the kitchen.
- Remove from the oven and let the bars cool in the pan for 10 minutes, then lift out using the parchment paper and cool completely on a wire rack for about 20 minutes.
- Once cooled, slice into squares with a sharp knife. The bars should be firm yet chewy, with bits of oats and banana visible throughout.
- Serve immediately or store in an airtight container at room temperature for up to 3 days, or freeze for longer storage. Reheat briefly if you prefer warm, gooey bars.
Pro tips for banana oat bars
- Bold the oats: Toast oats lightly in the pan first for a nuttier flavor and a slightly crispy texture.
- Press firmly: Use the back of a spatula or your fingers to really pack the mixture into the pan for sturdy bars.
- Smell check: When baking, a warm, toasted aroma of oats and caramelized banana indicates they’re ready.
- Avoid overbaking: Keep an eye on the edges turning golden; over-torched edges can turn bitter and dry.
- Add-ins last: Fold in chocolate chips or nuts gently at the end to prevent melting or sinking during baking.
- Cooling is key: Let the bars cool completely before slicing to prevent crumbling and achieve clean cuts.
- Reheat carefully: Microwave for 10-15 seconds until warm and soft, but avoid overheating to keep the texture tender.
Common mistakes and how to fix them
- FORGOT to check oven temperature → Use an oven thermometer to ensure correct heat.
- DUMPED too much flour → Measure accurately for proper texture and consistency.
- OVER-TORCHED the edges → Shield with foil halfway to prevent burning.
- UNDER-MIXED the ingredients → Mix thoroughly to avoid dry patches and uneven texture.
Quick fixes and pantry swaps
- If the bars crack when slicing, chill them in the fridge for 30 minutes first.
- When mixture is too dry, splash a teaspoon of water or milk to loosen it up.
- Dumped in too many chocolate chips? Add a handful more oats to balance moisture.
- Over-torched edges? Shield with foil and lower oven temp slightly for even baking.
- Splash a bit of lemon juice if bananas turn brown before mixing, to keep the color fresh.
Prep, store, and reheat tips
- Prep the mixture ahead: Mash bananas and mix oats, nut butter, and sweetener up to a day in advance. Keep in an airtight container in the fridge to retain freshness and aroma.
- Store baked bars in an airtight container at room temperature for up to 3 days. For longer storage, freeze them for up to 1 month, wrapped individually for easy grab-and-go.
- Refrigerate overnight to improve flavor melding. Let sit at room temperature for 10 minutes before serving to soften and reawaken aroma.
- Reheat bars briefly in the microwave for about 10-15 seconds until warm and slightly gooey. The smell of toasted oats and banana should shimmer back as they warm.
Top questions about banana oat bars
1. Can I use less ripe bananas?
Use very ripe bananas—deeply brown and soft—they give the bars their sweet, jammy flavor and moist texture.
2. What if my bananas are not very ripe?
Yes, but expect a milder banana flavor and slightly firmer bars. Riper bananas make them softer and sweeter.
3. Can I substitute the sweetener?
You can replace honey with maple syrup or agave; each adds a unique sweetness—maple is smokier, honey more floral.
4. What nut butter can I use?
Absolutely, try almond or cashew butter for different nutty notes. Peanut butter is classic but stronger in flavor.
5. Can I add other mix-ins?
Add dried cranberries or apricots instead of chocolate chips for a tangy, chewy burst of flavor.
6. Are these bars gluten or dairy free?
Yes. To make them gluten-free, use certified gluten-free oats. For dairy-free, swap in coconut yogurt or oil.
7. How do I know when they’re done?
Bake until edges are golden and the top is set, about 15–20 minutes at 180°C (350°F). They should smell toasted and sweet.
8. Should I let them cool before cutting?
Cool completely before slicing. They firm up as they cool, making clean cuts easier and avoiding crumbles.
9. How should I store leftovers?
Store in an airtight container at room temp for 3 days, or freeze for up to a month. Reheat briefly for softness.
10. What if my bars break apart?
If the bars crack when slicing, chill them in the fridge for 30 minutes. For sticky mixture, add a splash of water.
These banana oat bars are a simple reminder that nourishing snacks can come together with minimal fuss and maximum flavor. With just a few ingredients and a bit of patience, they turn into something you’ll want to keep in your pantry or grab on the way out the door. Sometimes, the best recipes are the ones you can rely on during busy mornings or when you need a quick, satisfying bite.
They’re not fancy, but they carry a certain comfort—warm banana aroma and chewy oats that fill the kitchen with a sense of home. No matter how often I make them, I appreciate how forgiving and adaptable this recipe is, always ready to be tweaked or simplified. It’s a little thing, but it sticks around through seasons and routines, always there when I need it.

Hey there, I’m Devon Harper. I run a small neighborhood café by day, cook most of my meals far too late at night, and write Midnight Grocery Runs somewhere in between. If you’ve ever wondered whether something simple could turn into something comforting after a long day, you’ll feel right at home here.


