There’s something about making caramel shortbread that feels like a warm secret from the oven, especially when you’re after that perfect balance of buttery richness and gooey caramel. It’s not fancy, but it’s honest, a bit rustic, and deeply satisfying in a way that store-bought just can’t match. I love the way the caramel softens the crisp shortbread, creating this messy, melty layer that’s impossible to resist.
This recipe is all about embracing the imperfect—maybe a slightly uneven caramel drizzle or a crumbly edge—and loving it for what it is. It’s the kind of treat I turn to when I need a little comfort, a reminder that sometimes simple ingredients, combined with a bit of patience, make the best desserts. Plus, it’s the kind of thing that feels like a little bit of home every time you cut into it.
Focusing on the nostalgic comfort of homemade caramel shortbread, this recipe emphasizes the imperfect, slightly rustic charm that makes each batch feel like a personal hug from the oven.
The story behind this recipe
- This recipe harks back to lazy Sunday afternoons at my grandma’s house, where the smell of caramel and butter always filled the air. I remember watching her pour that glossy caramel over the crumbly shortbread, the kitchen echoing with the sounds of gentle crackles in the pan. It’s a treat that’s rooted in those simple, unpolished moments of baking love and patience.
- One particular afternoon, I watched her with a knowing smile as she casually drizzled caramel in uneven lines—nothing perfect, just free and forgiving. It made me realize that the charm of this dessert isn’t in precision, but in the messy, warm imperfections that make each batch unique. That imperfect drizzle became my favorite part, a reminder that the best treats are often the most unpolished.
- heading
- story_type
Ingredient breakdown: key components
- Unsalted butter: I love how the richness melts into the shortbread, making it tender and buttery; for a slightly sharper flavor, try salted butter and reduce the salt in the dough.
- Golden caster sugar: Its fine grains dissolve quickly, giving the caramel a smooth, glossy finish; if you only have regular sugar, take a little extra time to melt it slowly over low heat.
- All-purpose flour: I prefer using a lightly sifted, soft flour for a tender shortbread base; for a nuttier taste, swap in a bit of ground almond flour, but watch the moisture levels.
- Sweetened condensed milk: It’s the magic that turns caramel gooey and rich; avoid overcooking it to prevent a burnt aroma—just simmer until it’s a deep, golden hue and smells sweet and caramel-y.
- Dark brown sugar: Adds depth and a smoky note to the caramel; if you only have light brown sugar, add a splash of molasses for that rich, toasted flavor.
- Sea salt flakes: I sprinkle it right before baking to contrast the sweetness; if you prefer a more pronounced saltiness, sprinkle a little extra on top after baking for crunch and burst of flavor.
- Vanilla extract: It enhances all the layers with a warm, mellow aroma; a splash of bourbon or whisky instead can give a subtle, boozy depth that pairs beautifully with the caramel.
Spotlight on key ingredients
Sweetened condensed milk:
- Its oozy, thick texture transforms into a rich, glossy caramel; watch for bubbling to avoid burning.
- Dark brown sugar: Imparts a smoky depth and a sticky, deep caramel aroma; it’s the backbone of that intense, toasted flavor.
Butter and sea salt:
- Butter: Melts into a tender, buttery shortbread with a subtle saltiness if salted butter is used; it’s the base of that melt-in-your-mouth texture.
- Sea salt flakes: Crystals sparkle and crackle on top, balancing the sweetness with a burst of savory contrast; don’t skip the sprinkle for that burst of flavor.
Notes for ingredient swaps
- Dairy-Free: Swap butter for coconut oil or vegan butter. The shortbread will be slightly crumblier, but still rich and tender.
- Gluten-Free: Use a 1:1 gluten-free flour blend. Expect a slightly denser texture, but it will hold together well.
- Sugar Alternatives: Replace golden caster sugar with coconut sugar or maple sugar. The caramel may develop a richer, caramel-like aroma, less bright but warm.
- Condensed Milk: Make your own by simmering a can of full-fat evaporated milk plus sugar until thickened, about 30 minutes. It’s less sweet but adds a deep, caramel flavor.
- Salted Caramel: Add an extra pinch of sea salt to the caramel mixture for a more pronounced salty-sweet contrast.
- Vanish Vanilla: Use vanilla bean paste for a more intense vanilla aroma or omit for a more straightforward caramel flavor.
- Extra Flavor: Stir in a teaspoon of espresso powder or a splash of bourbon into the caramel for depth and complexity.
Equipment & Tools
- Mixing bowls: For mixing and creaming ingredients.
- Electric mixer or whisk: To beat butter and sugar until fluffy.
- Sieve: To sift flour and salt for a tender base.
- 20cm (8-inch) square baking tin: To bake and assemble the shortbread and caramel.
- Parchment paper: For easy removal and cleanup.
- Saucepan: To cook the caramel evenly.
- Spatula: To spread caramel and smooth the top.
- Sharp knife: For clean slicing once firm.
Step-by-step guide to caramel shortbread
- Preheat your oven to 160°C (320°F). Line a 20cm (8-inch) square baking tin with parchment paper, leaving overhang for easy removal.
- Make the shortbread base: In a mixing bowl, cream together 115g (1/2 cup) unsalted butter and 50g (1/4 cup) golden caster sugar until light and fluffy, about 2 minutes. Add 1 teaspoon vanilla extract and mix well.
- Sift in 150g (1 1/4 cups) all-purpose flour and a pinch of salt. Mix until just combined. Press this dough evenly into the prepared tin, smoothing the top with the back of a spoon or your fingers.
- Bake the shortbread base for 20-25 minutes. It should be golden around the edges and firm in the center. Remove from oven and set aside to cool slightly, about 10 minutes.
- Prepare the caramel: In a heavy-bottomed saucepan over low heat, combine 200g (about 1 cup) sweetened condensed milk, 100g (1/2 cup) dark brown sugar, 50g (1/4 cup) unsalted butter, and a pinch of salt. Stir constantly until the butter melts and the mixture begins to bubble gently.
- Increase heat to medium and cook, stirring continuously, until the caramel thickens and turns a rich amber color, about 8-10 minutes. It should have a glossy, oozy texture and smell sweet and caramel-y. If it starts to burn or smell smoky, lower the heat immediately.
- Pour the hot caramel over the warm shortbread base, spreading it evenly with a spatula. Tap the tin gently on the counter to settle the caramel and remove air bubbles.
- Bake the assembled treat for an additional 15 minutes at 160°C (320°F) until the caramel is bubbling at the edges and just starting to set.
- Remove from oven and allow to cool completely in the tin, then refrigerate for at least 2 hours or until firm. This helps the caramel set and makes slicing easier.
- Once chilled, lift the whole block out of the tin using the parchment overhang. Slice into squares or rectangles with a sharp knife. For clean cuts, wipe the blade between slices.
- Finish with a light sprinkle of sea salt flakes if you like, then serve or store in an airtight container. Keep refrigerated for up to 5 days.
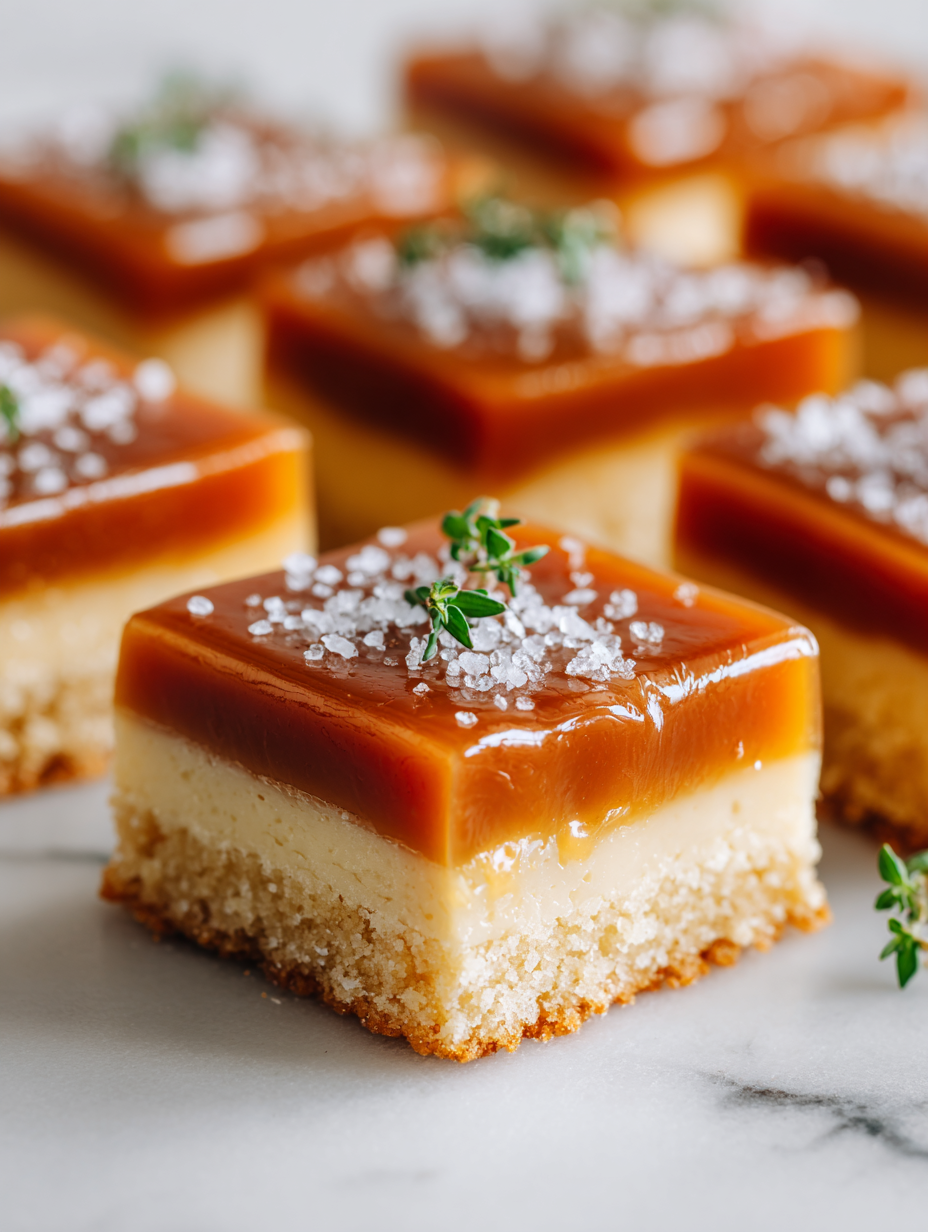
Allow the caramel shortbread to cool completely in the fridge, then slice into neat squares. Finish with a sprinkle of sea salt if desired. Serve directly or store in an airtight container in the fridge for up to 5 days.
How to Know It’s Done
- Caramel is glossy, golden, and thickens when cooked.
- Shortbread is golden-brown and crispy around the edges.
- Caramel is bubbling gently at the edges when ready for baking.
Caramel Shortbread
Ingredients
Equipment
Method
- Line your baking tin with parchment paper, leaving overhang for easy removal, and preheat your oven to 160°C (320°F).
- In a mixing bowl, cream together softened butter and golden caster sugar until the mixture is light and fluffy, about 2 minutes. Add vanilla extract and mix well.
- Sift in the flour and a pinch of salt, then gently fold everything together until just combined. Press this dough evenly into the prepared tin, smoothing the surface with the back of a spoon or your fingers.
- Bake the shortbread base for 20-25 minutes until it turns golden around the edges and feels firm when lightly pressed. Remove from the oven and let it cool slightly in the tin for about 10 minutes.
- Meanwhile, prepare the caramel: in a saucepan over low heat, combine sweetened condensed milk, dark brown sugar, and butter. Stir constantly until the butter melts and the mixture starts to bubble gently, about 3-4 minutes.
- Increase the heat to medium and cook, stirring continuously, until the caramel thickens, turns a deep amber color, and smells sweet and caramel-y, about 8-10 minutes. Once ready, pour the hot caramel over the slightly cooled shortbread base, spreading it evenly with a spatula.
- Bake the assembled treat for an additional 15 minutes until the caramel is bubbling at the edges and just starting to set. Remove from oven and allow to cool completely in the tin.
- Once cooled, refrigerate for at least 2 hours or until the caramel is firm. Use the parchment overhang to lift the block out of the tin, then cut into squares with a sharp knife, wiping the blade between slices for clean cuts.
- Sprinkle with a few flakes of sea salt for contrast, if desired, and serve. Store leftovers in an airtight container in the fridge for up to 5 days.
Tips & tricks for perfect caramel shortbread
- caramel: Use a gentle, steady heat to avoid burning and develop a rich, deep flavor.
- Sharp knife: Wipe the blade between cuts for clean, neat squares and less sticking.
- Golden shortbread: Bake until edges are just golden to keep it tender but firm enough to hold caramel.
- Even caramel: Stir continuously and watch for a glossy, amber hue to prevent graininess.
- Chill thoroughly: Refrigerate until fully set, ensuring clean slices and a firm texture.
- Sprinkle salt: Add flaky sea salt just before serving to enhance sweetness and add crunch.
- Avoid overbaking: Keep an eye on the caramel bubbling at edges—overbaking leads to a bitter taste.
Common mistakes and how to fix them
- FORGOT to watch caramel: it can burn quickly. Keep stirring and remove from heat at amber hue.
- DUMPED caramel: if it separates or becomes grainy, gently reheat with a splash of cream and stir.
- OVER-TORCHED shortbread: if edges turn dark quickly, lower oven temperature or cover loosely with foil.
- UNDERRIPE caramel: if it remains runny after cooling, extend cooking time slowly and watch for deep amber color.
Quick fixes and pantry swaps
- When caramel is grainy, splash in a little cream and stir gently to smooth it out.
- If shortbread cracks while baking, patch with a tiny bit of butter or re-bake briefly.
- Splash a few drops of lemon juice in caramel if it’s too thick or dull in flavor.
- Patch burnt caramel with a layer of fresh caramel or whipped cream for extra richness.
- Shield caramel from over-torching by covering the tin loosely with foil during baking.
Prep, store, and reheat tips
- Prepare the shortbread base a day ahead; keep it in an airtight container at room temperature for a soft, crumbly texture.
- Make the caramel up to 24 hours in advance; store in the fridge in a sealed container, where it will thicken slightly and develop a richer aroma.
- Refrigerate the assembled caramel shortbread for at least 2 hours or overnight to allow the caramel to set fully and flavors to meld.
- Reheat slices gently in the microwave for 10-15 seconds until just warm and slightly gooey; the caramel softens beautifully with gentle warmth.
- Shelf life is about 4-5 days in the fridge; the caramel may become softer over time, but the flavors deepen and mellow.
Top questions about caramel shortbread
1. How do I know when the caramel is done?
Look for a glossy, deep amber color and a thick, gooey texture. It should crackle slightly when stirred.
2. What’s the right texture for baked shortbread?
The shortbread should be golden around the edges and firm but tender when pressed lightly.
3. How do I get clean slices?
Use a sharp knife wiped clean between cuts for neat squares. Wipe the blade with a damp cloth after each slice.
4. How long can I keep it in the fridge?
Refrigerate the caramel shortbread, covered, for up to 5 days. Let it sit at room temperature for 10 minutes before serving to soften slightly.
5. Can I make this dairy-free?
You can swap butter for coconut oil for a dairy-free version, but expect a slightly crumblier texture.
6. Should I add more salt?
Adding a pinch of salt on top after baking enhances the caramel’s richness and balances the sweetness.
7. What if my caramel is grainy?
If the caramel separates or becomes grainy, gently reheat with a splash of cream and stir until smooth.
8. How should I cook the caramel?
Use a low to medium heat for cooking caramel to prevent burning and develop a rich flavor without smoky notes.
9. How long should I refrigerate before slicing?
Allow the caramel to cool and set in the fridge for at least 2 hours for best slicing results.
10. What are visual clues it’s finished?
When the caramel is bubbling at the edges and the shortbread is golden, it’s ready to come out of the oven.
Baking this caramel shortbread always feels like a small act of rebellion against perfect, polished desserts. It’s about embracing the messy, sticky, buttery moments that make baking feel real and honest. Every time I cut into it, I remember why I love the simple magic of homemade treats.
It’s not just about the flavor, but the memories woven into each crumb and gooey layer. Sometimes, the imperfect presentation makes it all the more special, a little reminder that the best desserts come from a little chaos and a lot of love.

Hey there, I’m Devon Harper. I run a small neighborhood café by day, cook most of my meals far too late at night, and write Midnight Grocery Runs somewhere in between. If you’ve ever wondered whether something simple could turn into something comforting after a long day, you’ll feel right at home here.


