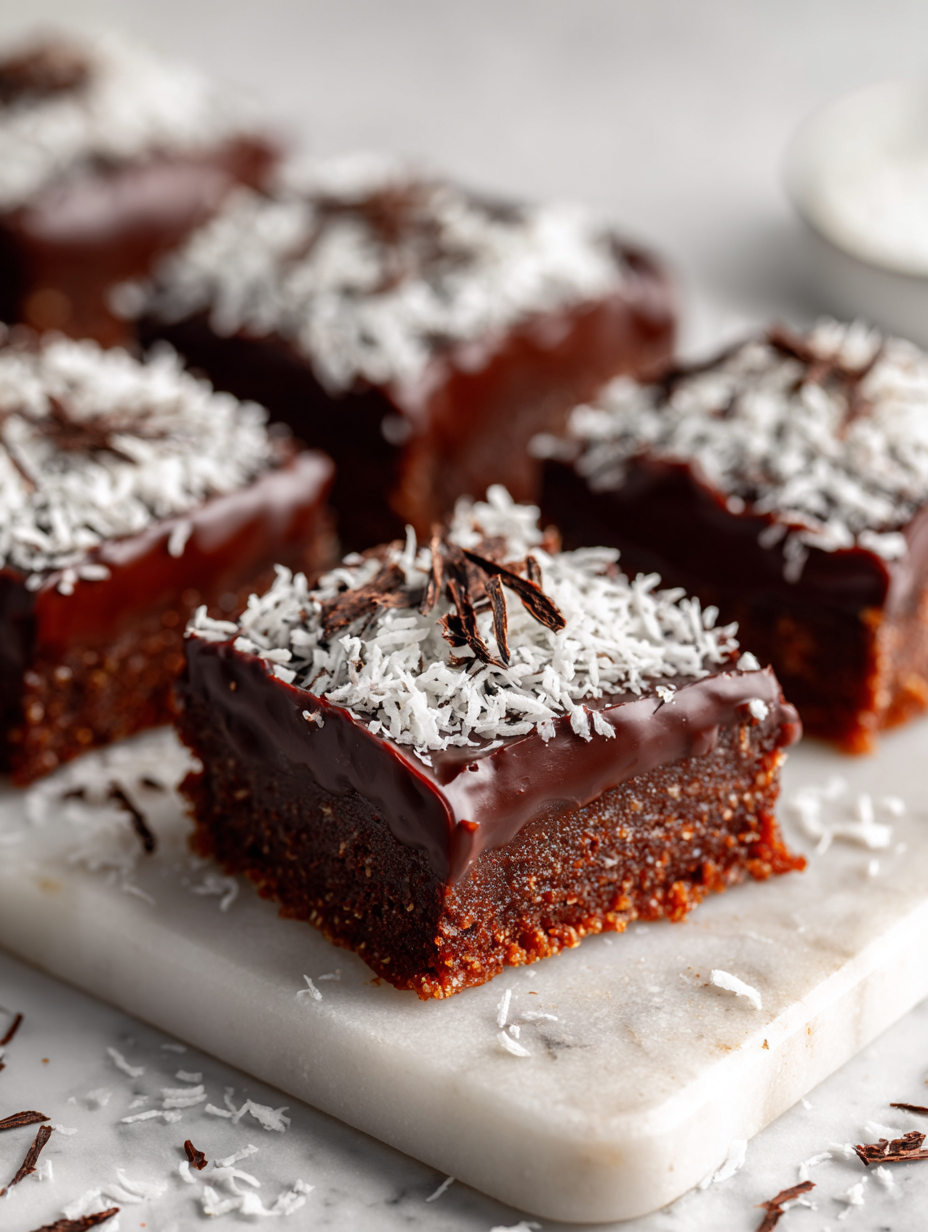
These Chocolate Coconut Bars are a little nostalgic, a little indulgent, and honestly, a bit chaotic to make but worth every messy second. I love how the chewy coconut layer sticks to your fingers, while the silky chocolate melts just enough to coat everything in a rich, sweet gloss. They’re the kind of treat that feels like a guilty pleasure, but with a twist of toasted coconut crunch that keeps you coming back.
What makes this recipe special is how it balances comfort and surprise. It’s a no-fuss kind of baking that lets you toss ingredients together and still end up with something memorable. Plus, the aroma of toasted coconut mingling with warm chocolate is enough to make the whole house smell like a cozy bakery in the middle of winter. It’s imperfect, messy, but utterly satisfying—a perfect kitchen project when you need a little sweet chaos.
Focusing on how the chewy coconut and silky chocolate layers come together to create a nostalgic treat that feels both comforting and indulgent, with a twist of unexpected crunch from toasted coconut flakes.
The story behind this recipe
- This recipe was born out of a lazy Sunday afternoon, when I found a dusty bag of toasted coconut in the back of the pantry. I was craving something sweet but didn’t want to fuss over complicated baking. The idea of combining rich chocolate with toasted coconut took hold, and I just started tossing ingredients together, hoping for the best.
- I remember the first batch being a complete mess—melty chocolate everywhere, coconut flakes sticking to everything—but the flavor was undeniable. That slightly smoky, toasted coconut paired with the silky chocolate just clicked. Ever since, it’s been my go-to quick treat when I need a little comfort, no matter how chaotic the process.
- heading: ‘The story behind this recipe’
Key ingredients and tips
- Coconut flakes: I love using toasted shredded coconut for that deep, smoky aroma that makes the bars feel extra special. If you want more crunch, sprinkle a few extra flakes on top before chilling.
- Dark chocolate: I prefer a high-quality, 70% cacao bar that melts smoothly and balances the sweetness without overwhelming. For a milder flavor, swap in milk chocolate, but expect a creamier, less intense result.
- Sweetened condensed milk: It turns the coconut mixture into a chewy, sticky layer that holds everything together. If you’re dairy-free, try coconut cream or a thick syrup—just expect a slightly different texture.
- Butter: I use unsalted because it offers a clean, rich flavor that complements the coconut and chocolate. For a dairy-free version, coconut oil works well, and it adds a subtle tropical note.
- Vanilla extract: A splash of pure vanilla really enhances the richness and depth. Skip it if you’re out, but don’t skip the flavor boost—it makes a noticeable difference.
- Salt: Just a pinch to cut the sweetness and make the flavors pop. If you love a salty-sweet combo, sprinkle a little more on top before serving.
- Optional toppings: Chopped nuts or flaky sea salt can add texture and contrast. I like a sprinkle of sea salt right before chilling—it’s the perfect finishing touch.
Spotlight on key ingredients
Coconut flakes:
- I love toasted coconut for its smoky aroma and chewy texture that adds depth and crunch.
- If you want more bite, sprinkle extra flakes on top before chilling to intensify that toasted flavor.
Dark chocolate:
- I prefer a 70% cacao bar for a rich, bittersweet flavor that melts smoothly and coats everything.
- Switch to milk chocolate if you want a milder, creamier sweetness, but expect less intensity in cocoa.
Ingredient swaps to try
- Dairy-Free: Swap regular butter for coconut oil or vegan butter. Expect a slightly different richness and a hint of coconut aroma.
- Chocolate: Use milk chocolate for a creamier, sweeter flavor, or dairy-free dark chocolate for a more intense cocoa punch.
- Sweetened Condensed Milk: Try coconut condensed milk or a thick coconut cream for a dairy-free option that adds a subtle tropical flavor.
- Coconut: Unsweetened shredded coconut can be replaced with toasted coconut flakes for extra crunch and smoky depth.
- Toppings: Sprinkle flaky sea salt for contrast, or chopped nuts like macadamias or almonds for added texture—both work well with the tropical vibe.
- Sweetener: Honey or maple syrup can replace condensed milk, but expect a thinner, less sticky layer with a nuanced flavor.
- Add-ins: Dried fruit or chopped crystallized ginger can be stirred into the coconut layer for more complexity and a chewy bite.
Equipment & Tools
- 9×9 inch pan: To hold and shape the bars.
- Parchment paper: To prevent sticking and make removal easier.
- Heatproof bowl: For melting chocolate smoothly.
- Spatula: To spread and press layers evenly.
- Sharp knife: To cut bars cleanly.
Step-by-step guide to chocolate coconut bars
- Equipment & Tools: line a 9×9 inch pan with parchment paper, a heatproof bowl for melting, a spatula, and a sharp knife.
- Melt chocolate: place chopped dark chocolate in the bowl. Heat gently over a double boiler or microwave in 20-second bursts, stirring until smooth, about 1-2 mins. Set aside to cool slightly.
- Prepare coconut layer: in a mixing bowl, combine shredded toasted coconut, sweetened condensed milk, melted butter, vanilla, and a pinch of salt. Mix until well combined and sticky.
- Press coconut base: transfer mixture to the prepared pan. Use the back of a spatula or your fingers to press evenly into the pan. Chill for 15 mins to set slightly.
- Pour chocolate layer: once coconut is firm but not hard, pour the melted chocolate over it. Use a spatula to spread evenly. Tap the pan gently to settle the chocolate.
- Add toppings: sprinkle additional toasted coconut flakes or sea salt on top if desired. Lightly press them into the chocolate for adhesion.
- Chill and set: refrigerate the bars for at least 2 hours, or until the chocolate is firm and the coconut layer is chewy. Avoid rushing this step for best texture.
- Cut into bars: once fully chilled, use a sharp knife to cut into squares. Wipe the knife clean between cuts for neat edges.
- Rest before serving: let the bars sit at room temperature for 5 minutes before serving to soften slightly and enhance flavor.
Chill the bars uncovered in the refrigerator for at least 2 hours. Let sit at room temperature for 5 minutes before slicing and serving. Store in an airtight container in the fridge for up to a week.
How to Know It’s Done
- Chocolate is glossy and firm but still melts slightly when pressed.
- Coconut layer is chewy and holds together without crumbling.
- Bars are evenly cut with clean edges, not jagged or sticky.
Chocolate Coconut Bars
Ingredients
Equipment
Method
- Line your 9x9 inch pan with parchment paper, leaving some overhang for easy removal.
- Place the chopped dark chocolate in a heatproof bowl and gently melt it in the microwave in 20-second bursts, stirring in between, until smooth and glossy. Set aside to cool slightly.
- In a mixing bowl, combine the toasted shredded coconut, sweetened condensed milk, melted butter, vanilla extract, and a pinch of salt. Mix everything together with a spatula until the mixture is sticky, fragrant, and well combined.
- Transfer the coconut mixture into the prepared pan. Use the back of a spatula or your fingers to press it evenly into the pan, creating a compact, chewy base. Chill in the fridge for about 15 minutes to firm up slightly.
- Pour the melted chocolate over the chilled coconut layer, spreading it out evenly with a spatula. Gently tap the pan on the counter to settle the chocolate and remove any air bubbles.
- Sprinkle additional toasted coconut flakes or flaky sea salt on top, pressing them lightly into the chocolate to ensure they stick.
- Refrigerate the bars for at least 2 hours, or until the chocolate is fully set and the coconut layer is chewy and firm.
- Once chilled, use the parchment overhang to lift the bars out of the pan. Place on a cutting board and use a sharp knife to cut into neat squares, wiping the blade between cuts for clean edges.
- Let the bars sit at room temperature for about 5 minutes before serving to soften slightly and enhance the flavor. Enjoy these decadent, chewy, and crunchy treats!
Notes
Pro tips for perfect bars
- Bolded mini-head: Use low, gentle heat when melting chocolate to prevent seizing and burn marks.
- Bolded mini-head: Toast coconut flakes until golden and fragrant—this extra step amplifies their smoky aroma and crunch.
- Bolded mini-head: Chill the coconut layer briefly before pouring chocolate—this helps layers set smoothly without mixing.
- Bolded mini-head: Wipe the knife between cuts to get clean, neat edges without tearing the bars apart.
- Bolded mini-head: Lightly tap the pan on the counter after pouring chocolate to settle bubbles and even out the surface.
- Bolded mini-head: For extra shine, briefly warm the bars in a low oven (around 50°C/122°F) before serving, if needed.
- Bolded mini-head: Add a pinch of sea salt on top just before chilling for a flavor contrast that enhances sweetness.
Common mistakes and how to fix them
- FORGOT to check chocolate melting point → Use low heat to prevent scorching.
- DUMPED coconut too early → Wait until the coconut mixture is sticky and set.
- OVER-TORCHED chocolate → Remove from heat immediately if chocolate starts to seize.
- MISSED stirring coconut layer → Mix thoroughly for even texture and flavor distribution.
Quick fixes and pantry swaps
- When chocolate seizes, splash in a few drops of vegetable oil and stir gently.
- If coconut sticks too much, lightly butter your hands before pressing the mixture.
- Over-torched chocolate? Patch it with a small amount of fresh, melted chocolate and remix.
- Dumped coconut isn’t sticky enough? Rescue with a teaspoon of honey or maple syrup.
- When bars crack when cutting, chill them in the freezer for 10 minutes for cleaner slices.
Prep, store, and reheat tips
- Prepare and press the coconut layer in advance; it can be refrigerated for up to 24 hours before adding the chocolate.
- Store the assembled bars in an airtight container in the fridge for up to a week; the coconut stays chewy and chocolate firm.
- For longer storage, freeze bars wrapped tightly in plastic wrap and foil for up to one month; thaw at room temperature for 10-15 minutes before serving.
- Reheat slightly in a warm (not hot) oven or microwave for a few seconds to soften the chocolate and coconut; look for a gentle shimmer and aroma of toasted coconut.
Top questions about chocolate coconut bars
1. How do I know when the chocolate is melted enough?
Look for a glossy, firm chocolate layer that cracks when you gently bend a bar. The coconut should be chewy but not sticky, with a slight bounce when pressed.
2. What texture should the coconut layer have before adding chocolate?
The coconut layer should be sticky and hold together when pressed, but not so wet it’s runny. It should have a fragrant toasted aroma.
3. How long do I need to chill the bars?
Chill the bars until the chocolate is completely firm, usually about 2 hours in the fridge. The chocolate should snap cleanly when cut.
4. Why do my bars crack when I cut them?
Use a sharp knife, wiped clean between cuts, to get neat edges. If the chocolate cracks, let the bars sit at room temperature for a few minutes first.
5. Can I make this recipe dairy-free?
You can substitute coconut oil or vegan butter for regular butter for a dairy-free version. Expect a slightly more delicate coconut layer.
6. Can I use different types of chocolate?
Replace dark chocolate with milk chocolate for a creamier, sweeter flavor. Dark chocolate gives a richer, more intense cocoa taste.
7. How do I toast coconut flakes properly?
Toast shredded coconut until golden for an extra smoky aroma. Keep an eye on it to prevent burning—it happens quickly.
8. What if my melted chocolate becomes grainy?
If the chocolate seizes or becomes grainy, add a few drops of vegetable oil and stir gently to smooth it out.
9. How should I store leftovers?
Store the bars in an airtight container in the fridge for up to a week. To soften slightly before serving, let sit at room temperature for 5 minutes.
10. My coconut layer is crumbly, what can I do?
When the coconut layer is too dry or crumbly, stir in a little extra condensed milk or honey to restore stickiness.
These bars are comfort in a bite, especially when the house smells like toasted coconut and melting chocolate. They remind me of lazy Sunday afternoons and the chaos of kitchen experiments that somehow turn out sweet and satisfying.
Sharing them with friends or just stashing a few for myself feels like a small victory. No matter how messy the process, the end result always makes me smile—rich, chewy, with that perfect crunch of toasted coconut.

Hey there, I’m Devon Harper. I run a small neighborhood café by day, cook most of my meals far too late at night, and write Midnight Grocery Runs somewhere in between. If you’ve ever wondered whether something simple could turn into something comforting after a long day, you’ll feel right at home here.


