There’s something about biting into a homemade date bar that instantly takes me back to lazy afternoons in my grandma’s kitchen. The smell of caramelized dates mingling with toasted oats, it’s just pure comfort — a sweet, sticky hug that feels like a secret. Making them from scratch feels like reclaiming a piece of that simple joy, especially when I want something satisfying but not overly fancy.
What I love most is how forgiving this recipe is. No fancy ingredients, just a handful of pantry staples and a bit of patience. The medjool dates turn soft and oozy, and when combined with toasted nuts and a crispy oat crust, it’s a combo that’s hard to beat. It’s not just a snack — it’s a little ritual that reconnects me to simpler times, even on hectic days.
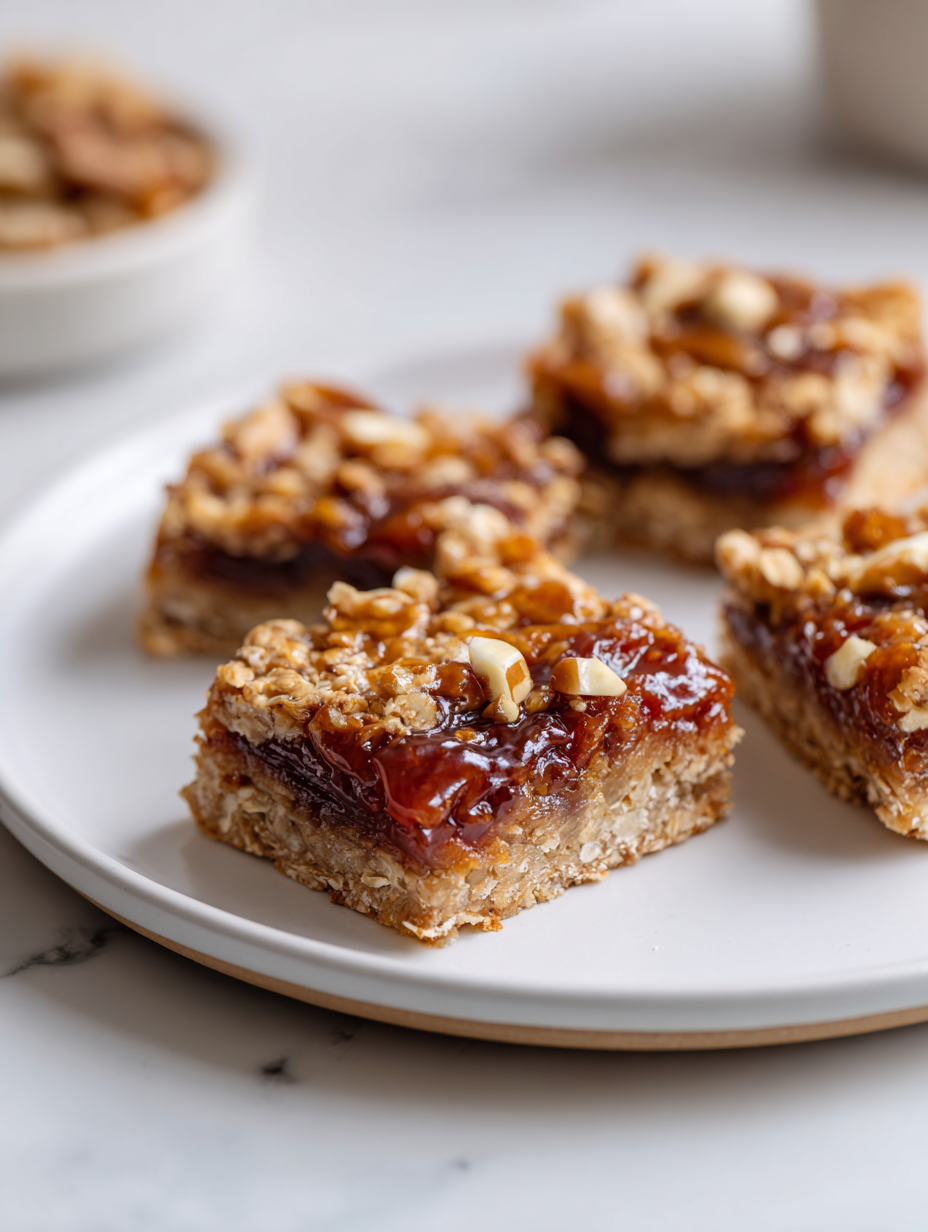
Focusing on the nostalgic comfort of homemade date bars, this recipe emphasizes using medjool dates for their rich caramel flavor and soft texture, making it feel like a warm hug from childhood desserts.
The story behind this recipe
- This recipe is a nod to my childhood afternoons spent helping my grandmother in her tiny, cluttered kitchen. She had a way of making simple ingredients feel like magic, especially when she pulled out her stash of dates and toasted oats. I remember the warm, caramel scent filling the air as she pressed the sticky medjool dates into the crust, a process that felt almost meditative. Those moments of quiet baking are etched in my memory, and now I try to recreate that cozy, familiar feeling with these bars.
- What started as a way to use up an overabundance of dates from a lazy summer harvest turned into a ritual I cherish. I like to think that making these bars keeps a little piece of that old-school, honest baking alive. They’re not fancy, just honest and forgiving—perfect for days when I need a sweet reminder of home. Every batch feels like a small act of nostalgia, a way to slow down and savor the simple things.
- story_type
Ingredient breakdown: key components
- Medjool dates: They’re the star, giving that rich, caramel sweetness. If you can’t find them, soft deglet noor work, but they’re less oozy and more mild.
- Oats: I like rolled oats for that hearty texture. Quick oats get too soft, losing the crunch I love. Toast them lightly for a nuttier flavor.
- Nuts: I prefer toasted almonds for a subtle smoky note, but walnuts or pecans are good swaps. Toast them to bring out their oils and aroma.
- Butter: It adds richness, making the bars melt in your mouth. For a dairy-free version, try coconut oil—less creamy but still tasty.
- Sweetener: Brown sugar works well, adding a touch of molasses warmth. Honey is a nice alternative but makes the crust a bit stickier.
- Salt: Just a pinch enhances all the flavors. Don’t skip it, even if it seems small—it balances the sweetness beautifully.
- Vanilla extract: A splash deepens the caramel notes. Skip if you want a more straightforward date flavor, but I think it adds a cozy layer.
Spotlight on key ingredients
Dates:
- Medjool dates: They’re the star, giving that rich, caramel sweetness. If you can’t find them, soft deglet noor work, but they’re less oozy and more mild.
- Oats: I like rolled oats for that hearty texture. Quick oats get too soft, losing the crunch I love. Toast them lightly for a nuttier flavor.
Nuts and Butter:
- Nuts: I prefer toasted almonds for a subtle smoky note, but walnuts or pecans are good swaps. Toast them to bring out their oils and aroma.
- Butter: It adds richness, making the bars melt in your mouth. For a dairy-free version, try coconut oil—less creamy but still tasty.
Notes for ingredient swaps
- Dairy-Free: Swap butter for coconut oil—less creamy, but still adds richness and a subtle coconut aroma.
- Sweetener: Use maple syrup instead of brown sugar—brings a mild, caramel-like flavor, slightly stickier crust.
- Nuts: Try roasted hazelnuts or cashews—offer different crunch and flavor, toast them first for best aroma.
- Oats: Replace rolled oats with quick oats—quicker to cook, but may result in a softer, less chewy bar.
- Dates: If Medjool are unavailable, soft deglet noor work—less oozy but still sweet with a mild caramel note.
- Salt: Sea salt flakes instead of fine salt—adds a slight crunch and bursts of saltiness with each bite.
- Vanilla: Almond or coconut extract—offers a different aromatic twist, use sparingly to avoid overpowering.
Equipment & Tools
- Baking pan (20cm square): Holds the bars during baking and shaping.
- Skillet or dry pan: To toast oats and nuts for flavor.
- Mixing bowls: Combine and mix ingredients.
- Small saucepan: Melt butter or coconut oil.
- Spatula or spoon: Stir ingredients and spread mixture.
- Sharp knife: Cutting the cooled bars.
- Parchment paper (optional): Eases removal and cleaning.
Step-by-step guide to date bars
- Preheat your oven to 180°C (350°F). Lightly grease a 20cm (8-inch) square baking pan or line it with parchment paper for easy removal.
- Toast the oats and nuts separately in a dry skillet over medium heat, about 5 minutes, until golden and fragrant. Let cool slightly.
- Pit the medjool dates if they aren’t pitted. Chop them into small pieces; they should feel soft and slightly oozy. Set aside.
- In a mixing bowl, combine the toasted oats, chopped nuts, a pinch of salt, and brown sugar. Mix well to distribute evenly.
- Melt the butter (or coconut oil for dairy-free) in a small saucepan over low heat. Stir in vanilla extract. Pour over the dry ingredients and mix until crumbly but sticky.
- Press half of the oat mixture firmly into the prepared baking pan to form the crust. Use the bottom of a glass for even pressure.
- Spread the chopped dates evenly over the crust. Gently press them into the crust to ensure they stay put during baking.
- Top with the remaining oat mixture, pressing lightly to cover the dates. Bake for 20–25 minutes, or until the edges are golden and bubbling.
- Remove from oven. Let cool in the pan for about 10 minutes, then transfer to a wire rack or let cool completely in the pan for easier slicing.
- Once cooled, cut into bars with a sharp knife. For cleaner cuts, wipe the blade with a damp cloth between cuts.
Let the bars cool completely before slicing. Use a sharp knife to cut into neat squares or rectangles. Serve at room temperature or store in an airtight container.
How to Know It’s Done
- Crust turns golden brown and fragrant.
- Dates are soft and oozy when pressed gently.
- Bars hold together when sliced without crumbling.
Homemade Date Bars
Ingredients
Equipment
Method
- Preheat your oven to 180°C (350°F). Line a 20cm square baking pan with parchment paper or lightly grease it. Begin by toasting the rolled oats in a dry skillet over medium heat for about 5 minutes, until they turn golden and fragrant. Let them cool slightly.
- While the oats cool, chop the pitted medjool dates into small pieces. They should feel soft and slightly oozy—if they’re too firm, warm them for a few seconds in the microwave to loosen them up.
- In a mixing bowl, combine the toasted oats, chopped toasted almonds, a pinch of salt, and brown sugar. Stir to evenly distribute the ingredients.
- In a small saucepan, melt the butter over low heat. Once melted, stir in the vanilla extract. Pour this warm mixture over the dry ingredients and stir until everything is coated and the mixture becomes crumbly but sticky.
- Press half of the oat mixture firmly into the prepared baking pan, using the back of a spoon or your fingers to create an even, compact crust. This forms the base layer of your bars.
- Spread the chopped dates evenly over the crust, gently pressing them into the layer to help them stay in place during baking.
- Top with the remaining oat mixture, pressing lightly to cover the dates completely and create a cohesive layer.
- Bake in the preheated oven for about 20–25 minutes, until the edges are golden brown and bubbling. The aroma of caramelized dates and toasted oats will fill your kitchen.
- Remove the pan from the oven and let the bars cool in the pan for at least 10 minutes. Then, transfer to a wire rack or leave in the pan to cool completely—this helps the bars set and makes slicing easier.
- Once cooled, use a sharp knife to cut into squares or rectangles. Wipe the blade with a damp cloth between cuts for clean, neat slices.
- Enjoy these warm or at room temperature. Store leftovers in an airtight container for up to 3 days, or freeze for longer storage. For an extra touch, sprinkle a tiny bit of sea salt flakes on top before serving.
Notes
Pro tips for perfect date bars
- Bolded Mini-Head: Use a light hand when pressing the date mixture; too much pressure can make the bars dense.
- Bolded Mini-Head: Toast oats and nuts until fragrant; this step develops flavor and adds depth to each bite.
- Bolded Mini-Head: Keep an eye on the oven; edges should be golden and bubbly, not burnt, around 20 minutes.
- Bolded Mini-Head: Spread the dates evenly and press gently; uneven layers can cause uneven baking or sticking.
- Bolded Mini-Head: Let the bars cool completely before slicing; warm bars tend to crumble and lose shape.
- Bolded Mini-Head: Use a sharp, warm knife for clean cuts; wipe between slices to avoid sticking and jagged edges.
- Bolded Mini-Head: For extra caramel flavor, sprinkle a pinch of sea salt flakes on top just after baking.
Common date bar mistakes and how to fix
- FORGOT to adjust oven rack height → place in center for even baking.
- DUMPED in too much sugar → reduce quantity for less sweetness and better texture.
- OVER-TORCHED the crust → lower heat or cover with foil if browning too fast.
- MISSED to check date softness → microwave dates briefly to loosen if too firm.
Quick fixes and pantry swaps
- When bars crumble, splash a little warm water on the knife, then wipe clean for neat cuts.
- If mixture feels too dry, open pantry and swap in a touch of honey for extra moisture.
- Splash a few seconds in the microwave to soften dates quickly if they feel too firm.
- Patch over over-baked edges with a sprinkle of crushed nuts to cover the burn aroma.
- Shield bars with foil if edges brown too fast, preserving that perfect golden hue.
Prep, store, and reheat tips
- Prepare the crust and topping mixture a day in advance; keep refrigerated to prevent sticking and maintain freshness.
- Dates can be chopped and stored in an airtight container at room temperature for up to 2 days or in the fridge for 1 week.
- Bars stay best in an airtight container at room temperature for up to 3 days; for longer storage, freeze for up to 1 month.
- Reheat slices briefly in a 180°C (350°F) oven for 5–7 minutes until warm and fragrant, with a slight shimmer of caramel reappearing.
Top questions about date bars
1. How do I pick good dates?
Look for soft, sticky medjool dates that feel slightly oozy when pressed. They should have a rich caramel aroma. If they’re too firm, warm them briefly to soften.
2. Can I use different oats?
You can replace oats with quick oats, but they’ll lose some of their chewy texture and crunch. Toast the oats first to boost flavor.
3. My bars crumble, what now?
If your bars turn out too crumbly, try pressing the mixture more firmly into the pan or adding a touch more melted butter to help it hold together.
4. How long do date bars last?
Store the bars in an airtight container at room temperature for up to 3 days, or freeze for up to a month. Reheat briefly in the oven to revive that fresh-baked smell.
5. Can I make these dairy-free?
For a dairy-free version, swap butter with coconut oil. It adds a slight coconut aroma and makes the bars just as rich.
6. Can I substitute the nuts?
Use chopped walnuts or pecans instead of almonds for a different crunch. Toast them first to enhance their flavor and aroma.
7. Dates too sticky to chop?
If your dates are too sticky and hard to chop, warm them for 10 seconds in the microwave. They’ll soften and become easier to work with.
8. How do I get clean slices?
Using a warm, sharp knife helps to get clean, neat slices. Wipe the blade between cuts to prevent sticking and crumbling.
9. Should I add salt on top?
Adding a pinch of sea salt flakes on top after baking enhances the caramel flavor and balances the sweetness beautifully.
10. Bars over-browning, what now?
If your bars are browning too fast, cover the pan loosely with foil during baking. This prevents over-torching while keeping them golden.
These date bars are more than just a snack; they’re a little taste of nostalgia that’s easy to whip up when you need comfort. The smell of toasted oats and caramelized dates filling the kitchen makes the whole house feel warmer, somehow. They’re perfect for sharing—or keeping all to yourself on a quiet afternoon.
Honestly, making them feels like a small act of kindness to yourself, especially when life feels busy. That rich, sticky bite is a reminder of simpler pleasures—something sweet, honest, and a little bit nostalgic to hold onto. Sometimes, that’s exactly what you need, no fancy fuss required.

Hey there, I’m Devon Harper. I run a small neighborhood café by day, cook most of my meals far too late at night, and write Midnight Grocery Runs somewhere in between. If you’ve ever wondered whether something simple could turn into something comforting after a long day, you’ll feel right at home here.


