Honey oat bread is one of those recipes that feels like a warm hug in bread form. There’s something about the way the honey’s sweetness melds with the hearty oats that makes every slice feel special, even if it’s just for breakfast. I love how it smells while baking—rich, slightly caramelized, with a hint of floral honey that makes the whole house smell cozy.
This bread isn’t just about taste; it’s about the act of slow, honest baking. I remember my grandma kneading dough in her sunny kitchen, the quiet rhythm of it. Making this bread always takes me back to those mornings filled with the smell of oats and honey, slow and messy and full of simple joy. It’s a recipe that turns everyday ingredients into something memorable, especially on mornings when I need a little extra comfort.
This recipe focuses on how honey and oats can transform a simple bread into a comforting, nostalgic treat that balances sweetness with hearty texture, reminding me of childhood mornings and the slow, messy joy of baking bread from scratch.
Nostalgic Comfort in Every Slice
- Baking this bread reminds me of lazy Sunday mornings at my grandma’s house, where the smell of oats and honey would fill the air.
- There’s a quiet pride in pulling a hot loaf from the oven, the crust crackling just right, with that sweet, toasty aroma wafting through the kitchen.
- Sometimes, I get a little chaotic—adding extra honey or oats—just to see how it tweaks the texture and flavor in small, happy ways.
- The first warm bite is a nostalgic rush, like a cozy blanket wrapped around you on a chilly day, full of comforting sweetness.
- Making this bread is a messy, honest process that makes me feel grounded—like I’m reconnecting with simple, good things.
The story behind this recipe
- This bread was born out of a lazy Sunday morning craving—something warm, slightly sweet, and utterly comforting. I was experimenting with adding oats and honey to my usual bread dough, hoping to get that perfect chewy texture with a touch of floral sweetness. The first loaf I pulled out of the oven had a crust that crackled just right and a crumb that was soft and hearty, reminding me of mornings spent in my childhood kitchen.
- Baking this bread became a little ritual—measuring, mixing, kneading, and waiting. It’s not a fancy recipe, just honest ingredients that come together in a way that feels grounding. It’s the kind of bread that makes your house smell like a cozy memory, and every slice feels like a small victory after a quiet effort.
- heading
- story_type
Trivia and Cultural Roots
- Honey oat bread has roots in rustic European baking traditions, where grains and sweeteners were often combined for hearty sustenance.
- Oats were historically considered a poor man’s grain in many cultures but gained popularity in bread for their hearty texture and health benefits.
- Honey as a sweetener in bread dates back centuries, used not only for sweetness but also for its natural preservative qualities.
- This bread’s combination of oats and honey became popular during the early 20th century, aligning with the rise of natural, wholesome ingredients in home baking.
- In some regions, honey oat bread is linked to traditional farmstead recipes, made with simple, pantry-staple ingredients that tell a story of humble origins.
Ingredient breakdown
- Honey: I love how honey adds a deep, floral sweetness that makes the bread feel special; use good-quality honey, and if you want less sweetness, cut back a bit.
- Oats: The oats give a hearty texture and a nutty flavor that’s almost chewy; steel-cut oats are great if you want more bite, but rolled oats work fine too.
- Bread Flour: I prefer bread flour for the structure and chewy crumb; all-purpose can work in a pinch, but expect a slightly softer texture.
- Yeast: Active dry yeast is my go-to—make sure it’s fresh or it might take longer to rise; instant yeast can be substituted but may need less proofing time.
- Milk: Warm milk helps activate the yeast and adds richness; if you’re dairy-free, almond or oat milk are decent swaps, but the flavor shifts a bit.
- Salt: Just a pinch enhances the sweetness and balances the oats; don’t skip, or the loaf might taste flat and dull.
- Additional Toppings (optional): A sprinkle of oats or a drizzle of honey on top before baking can add extra texture and shine—don’t skip the visual cue of a golden crust.
Spotlight on key ingredients
Honey:
- I love how honey adds a deep, floral sweetness that makes the bread feel special; use good-quality honey, and if you want less sweetness, cut back a bit.
- Oats: The oats give a hearty texture and a nutty flavor that’s almost chewy; steel-cut oats are great if you want more bite, but rolled oats work fine too.
Oats:
- They bring a subtle nutty aroma and a chewy texture that becomes slightly toasted and fragrant during baking.
- They behave differently depending on the type—rolled oats soften beautifully, while steel-cut oats maintain a hearty chew, adding rustic charm.
Notes for ingredient swaps
- Sweetener: Maple syrup can replace honey for a slightly different flavor profile, adding a subtle caramel note.
- Oats: Rolled oats are traditional, but steel-cut oats give a chewier texture; instant oats will soften more quickly.
- Flour: Whole wheat flour can be used instead of bread flour for a denser, nuttier loaf, but expect a slightly heavier crumb.
- Milk: Dairy-free milks like almond or oat milk work well; they may alter the richness and browning slightly.
- Butter/Oil: Coconut oil can add a mild sweetness and a subtle coconut aroma, replacing butter or neutral oils.
- Salt: Sea salt flakes give a more pronounced crunch and flavor; regular fine salt works fine if that’s what you have.
- Additional Toppings: Flaked oats or a drizzle of honey on top before baking add visual appeal and extra texture—skip if you prefer a simpler crust.
Equipment & Tools
- Large mixing bowls: Mix and rise the dough
- Dough scraper: Combine ingredients and shape dough
- Loaf pan: Shape and support the bread during baking
- Kitchen thermometer: Check internal temperature
- Oven: Bake the bread
- Wire rack: Cool the bread evenly
Step-by-step guide to honey oat bread
- Gather your ingredients: bread flour, rolled oats, active dry yeast, honey, warm milk, salt, and a little butter or oil. Have your mixing bowls, a dough scraper, and a loaf pan ready.
- Activate yeast: In a small bowl, combine warm milk (around 38°C/100°F) with a teaspoon of honey and the yeast. Let sit for 5-10 minutes until bubbly and frothy. If it doesn’t foam, start over with fresh yeast.
- Mix dry ingredients: In a large bowl, whisk together bread flour, oats, and salt. Create a well in the center.
- Combine wet ingredients: In a separate bowl, mix the remaining honey, melted butter or oil, and the activated yeast mixture. Pour into the well of dry ingredients.
- Form the dough: Using a spoon or dough scraper, stir until a shaggy dough forms. It should be sticky but manageable. Add a little more flour if too wet, or a splash of water if too dry.
- Knead the dough: Turn onto a floured surface. Knead for 8-10 minutes until smooth and elastic. You’ll notice it becomes less sticky and more pliable. If it tears, give it a little more kneading.
- First rise: Lightly oil the bowl, place the dough inside, and cover with a damp towel or plastic wrap. Let rise in a warm spot (around 24°C/75°F) for 1 to 1.5 hours, until doubled in size.
- Shape the loaf: Gently punch down the risen dough. Shape it into a tight oval or rectangle that fits your loaf pan. Place in greased pan, seam side down.
- Second rise: Cover again and let rise for about 45 minutes to an hour, until the dough just reaches the top of the pan and feels puffy.
- Preheat oven: Set to 190°C/375°F. Place a baking stone or an empty metal tray on the middle rack if you want a crisper crust.
- Bake the bread: Place the loaf in the oven. Bake for 30-35 minutes. The crust should turn a golden brown, and the loaf should sound hollow when tapped.
- Check doneness: Insert an instant-read thermometer in the center; it should read about 93°C/200°F. The crust should be deep golden and crackly.
- Cool and rest: Remove from the oven, transfer to a wire rack, and let cool for at least 20 minutes before slicing. The crust will firm up, and the crumb will set.
Allow the bread to cool on a wire rack for at least 20 minutes before slicing. This helps the crumb set and makes slicing easier without squishing the loaf. Slice with a serrated knife for clean cuts, and enjoy fresh or toasted.
How to Know It’s Done
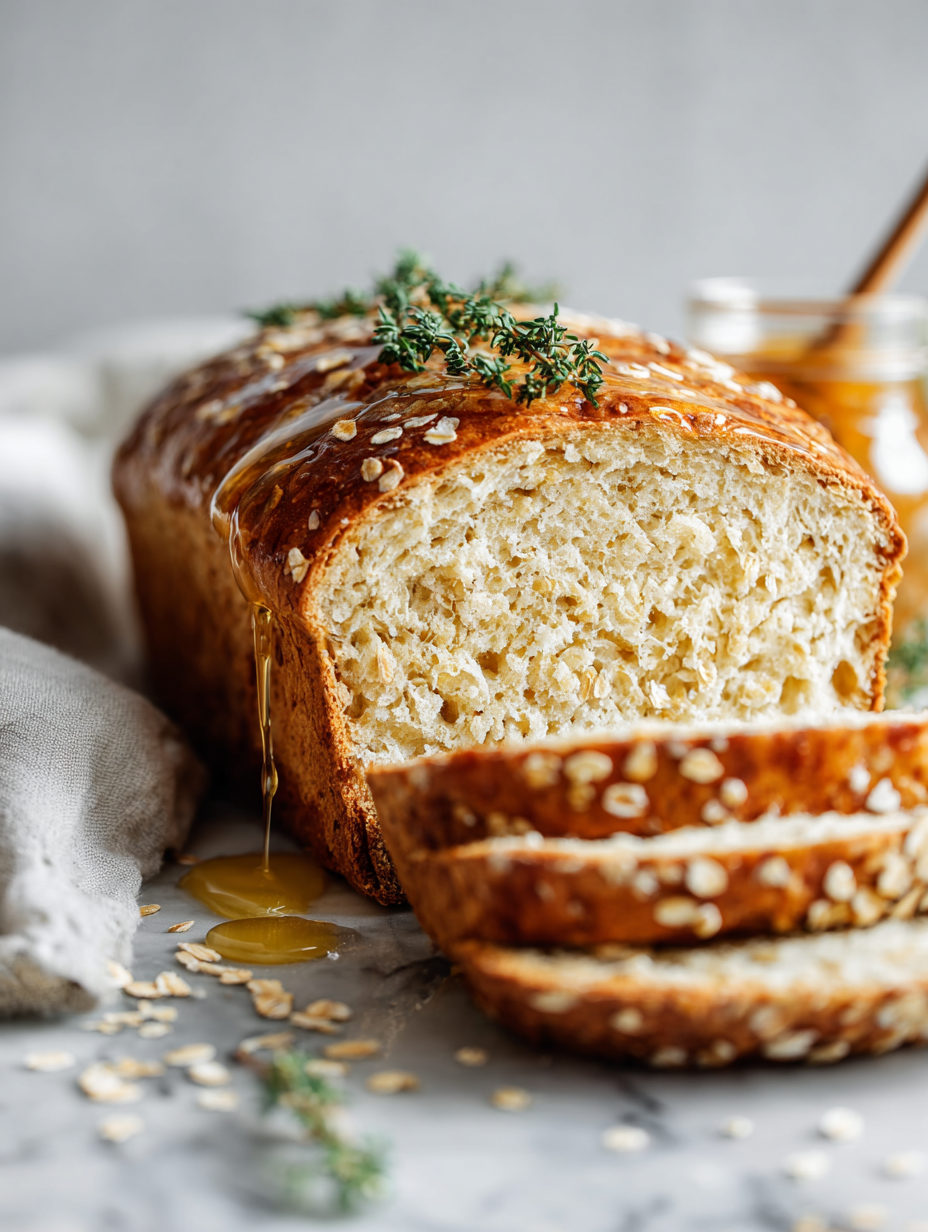
- Crust is golden and crackly, with a slight sheen.
- Internal temperature reaches 93°C/200°F for proper doneness.
- Loaf sounds hollow when tapped on the bottom.
Honey Oat Bread
Ingredients
Equipment
Method
- In a small bowl, combine warm milk with a teaspoon of honey and sprinkle the yeast over the top. Let sit for 5-10 minutes until bubbly and frothy, indicating the yeast is active.
- While the yeast activates, toast the oats lightly in a dry skillet until fragrant and slightly golden, then set aside to cool.
- In a large mixing bowl, whisk together the bread flour, toasted oats, and salt. Create a well in the center.
- In a separate bowl, mix the remaining honey, melted butter, and the activated yeast mixture.
- Pour the wet mixture into the well of dry ingredients and stir with a spoon or dough scraper until a shaggy, sticky dough forms.
- Turn the dough onto a floured surface and knead for about 8-10 minutes until it becomes smooth, elastic, and slightly tacky to the touch.
- Shape the dough into a ball, place it in a lightly oiled bowl, cover with a damp towel or plastic wrap, and let rise in a warm spot for about 1 to 1.5 hours until doubled in size and bubbly.
- Gently punch down the risen dough to release excess gas, then shape it into a loaf that fits your greased loaf pan. Place the shaped dough seam side down into the pan.
- Cover the loaf with a clean towel and let it rise again for 45 minutes to an hour, until it just reaches the top of the pan and feels puffy.
- Preheat your oven to 190°C (375°F). Once ready, place the loaf in the oven and bake for 30-35 minutes until the crust is deep golden and crackly.
- Check the bread’s internal temperature—it should reach about 93°C (200°F)—and tap the bottom; it should sound hollow. Remove from the oven and transfer to a wire rack to cool for at least 20 minutes before slicing.
- Slice once cooled, and enjoy the warm, hearty texture and sweet aroma of your homemade honey oat bread.
Notes
Pro tips for perfect honey oat bread
- Use hot, steaming milk to activate yeast quickly and help oats absorb moisture better.
- Toast oats lightly before mixing to enhance their nutty aroma and add depth to the bread.
- When kneading, look for a smooth, elastic dough that passes the windowpane test—stretch without tearing.
- For a crustier loaf, bake with steam—place a pan of hot water at the oven’s bottom during the first 10 minutes.
- If the loaf cracks excessively on top, cover loosely with foil halfway through baking to prevent over-browning.
- To keep the bread fresh longer, store in a paper bag at room temperature for 1-2 days, then wrap in plastic for longer storage.
- For a glossy finish, brush the loaf with a little milk or honey wash before baking—watch for a golden shimmer.
Common mistakes and how to fix them
- FORGOT to check yeast activation → Ensure yeast is bubbly before proceeding.
- DUMPED flour directly into wet → Mix dry and wet separately first for even distribution.
- OVER-TORCHED crust → Reduce oven temperature or bake for less time.
- SKIPPED resting time → Allow bread to cool for proper crumb setting and easier slicing.
Quick fixes and pantry swaps
- If bread is dense, boost oven humidity with a pan of water underneath.
- When crust is pale, increase baking time or temp slightly, watching for burning.
- Splash a little water in the oven to shimmer the crust and add crunch.
- Patch a collapsed loaf by gently reshaping and letting it rise again briefly before baking.
- Shield the crust with foil if it browns too quickly during the final minutes.
Prep, store, and reheat tips
- Prep the dough: You can assemble and knead the dough a day in advance, then refrigerate it overnight for a slow, flavorful fermentation that develops a slightly tangy aroma.
- Storing baked bread: Wrap cooled loaves tightly in plastic wrap or store in a bread box for up to 2 days; the crust will stay crisp if kept in a paper bag for the first day.
- Shelf life: Honey oat bread remains fresh for about 2-3 days at room temperature; refrigerate for longer storage, but expect the crumb to become denser.
- Reheating: Warm slices in a toaster or oven at 180°C/350°F for 5-8 minutes until fragrant and softening; the honey aroma will revive, and crust will regain some crispness.
Common questions about honey oat bread
1. How can I tell if my yeast is active?
Use fresh yeast that’s bubbly and active. If it doesn’t foam, start over with new yeast.
2. What if my dough is too sticky or too dry?
You want the dough to feel slightly sticky but manageable. Add a little more flour if too wet.
3. How do I know when the bread is done?
Ensure the bread is fully baked—internal temp should reach about 93°C/200°F, and it should sound hollow when tapped.
4. Can I slice the bread right after baking?
Use a serrated knife to slice, and wait at least 20 minutes after baking to let it set properly.
5. My crust isn’t golden enough, what should I do?
If the crust is too pale, bake for a few extra minutes or increase oven temperature slightly. Cover with foil if it over-browns.
6. How should I store leftover honey oat bread?
Store bread in a paper bag for the first day to keep crust crisp, then wrap in plastic for longer storage.
7. How do I reheat leftover bread?
Reheat slices in a 180°C/350°F oven for 5-8 minutes until warm and fragrant. Toast for extra crispness.
8. Any tips for kneading the dough properly?
Mix dry ingredients separately for even distribution, and knead until dough is smooth and elastic.
9. How can I get a crisper crust?
Adding steam during baking, by placing a pan of water in the oven, helps create a crisp crust.
10. Can I make this bread dairy-free?
To make it dairy-free, swap milk for almond or oat milk, but expect slight changes in browning and richness.
Baking this honey oat bread feels like capturing a quiet moment of satisfaction—smelling that sweet, toasty aroma while it cools is a small daily victory. Each slice carries a bit of nostalgia, a reminder of slow mornings and simple pleasures. It’s a humble loaf, but one that makes the everyday feel a little more special.
In a world that often rushes by, this bread offers a pause—an invitation to savor the smell, texture, and warmth of something honest and homemade. It’s not just bread; it’s a small act of care, a way to slow down and enjoy the mess and magic of baking from scratch.

Hey there, I’m Devon Harper. I run a small neighborhood café by day, cook most of my meals far too late at night, and write Midnight Grocery Runs somewhere in between. If you’ve ever wondered whether something simple could turn into something comforting after a long day, you’ll feel right at home here.


